0. 개요
이전에 Nodejs로 RestApi 서버를 실습한 적이 있습니다. 이거를 그때 당시엔 데이터베이스 데이터를 웹브라우저 상에서만 확인했었는데 유니티 클라이언트에서 데이터를 받는 방법도 정리를 해두면 좋을 거 같아 정리를 하게 되었습니다.
1. 서버 세팅
기본 구조는
[Node.Js] 서버 열고 DB연동해보기 (MySQL) :: 별빛상자 (tistory.com)
[Node.Js] 서버 열고 DB연동해보기 (MySQL)
저는 Visual Studio Code로 작업했어요. 1. Express 서버 열기 1-1. Visual Studio Code 실행 1-2. 작업 폴더 설정 1-3. 'Open Folder' 클릭 1-4. App.js 파일 생성 1-5. Express 서버 설정 커맨드창에 아래 명령어 입력 npm init
starlightbox.tistory.com
이걸 그대로 가져올 예정이나 여기선 유저정보 리스트만 볼 수 있기에 간단하게 기능을 추가하여 구현해보려고 합니다.
기존 기능
1. 유저리스트 정보 확인
추가 기능
1. 유저 추가
2. 유저 삭제
3. 유저 정보 변경
기존엔 SELECT만 사용 하고 있으니 INSERT, DELETE, UPDATE까지 사용해 볼 겸 이렇게 3가지 기능정도만 추가하면 좋을 거 같네요.
1_1. userDBC.js 수정
const mysql = require('mysql2');

// Create the connection pool. The pool-specific settings are the defaults
const pool = mysql.createPool
({
  host: 'localhost',
  user: 'user명',
  database: 'db명',
  password: '비밀번호',
  waitForConnections: true,
  connectionLimit: 10,
  queueLimit: 0
});

const getUsers = async ()=>
{
    const promisePool = pool.promise();
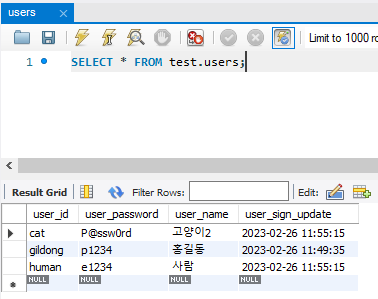
    const [rows] = await promisePool.query('SELECT * FROM users;');
    console.log(rows);
    return rows;
};

const insertUser = async (values)=>{
    const promisePool = pool.promise();
    const [rows] = await promisePool.query('INSERT INTO users (user_id, user_password, user_name) values (?, ?, ?)', values);
    return rows;
};

const deleteUser = async (userId) => {
    const promisePool = pool.promise();
    const [rows] = await promisePool.query('DELETE FROM users WHERE user_id = ?', [userId]);
    return rows;
};
const updateUser = async (userId, updatedValues) => {
    const promisePool = pool.promise();
    const [rows] = await promisePool.query('UPDATE users SET user_password = ?, user_name = ? WHERE user_id = ?', [...updatedValues, userId]);
    return rows;
};


module.exports =
{
    getUsers, insertUser, deleteUser, updateUser
};
1_2. userRouter.js 수정
const express = require('express');
const userDBC = require('./usersDBC');
const router = express.Router();

router.get('/getUsers', async (req, res)=>{
    let res_get_users = {
        status_code : 500,
        users : []
    };

    try{
        const rows = await userDBC.getUsers();
        res_get_users.status_code = 200;
        if(rows.length > 0){
            rows.forEach((user)=>{
                res_get_users.users.push({
                    user_name : user.user_name,
                    user_id : user.user_id,
                    user_password : user.user_password
                });
            });
        }else{
            console.log('사용자 없음');
        }
    }catch(error)
    {
        console.log(error.message);
    }finally
    {
        //응답
        res.json(res_get_users);
    }
});

router.post('/insertUser', async(req, res)=>{
    const res_signup = {
        status_code : 500
    };

    try{
        const {user_id, user_password, user_name} =  req.body;
        const rows = await userDBC.insertUser([user_id, user_password, user_name]);
        if(rows.affectedRows > 0){
            // 정상작동
            res_signup.status_code = 200;
        }else{
            // ERROR
            res_signup.status_code = 201;
        }
    }catch(err)
    {
        // ERROR
        console.log(err.message);
    }finally{
        res.json(res_signup);
    }
});

router.post('/deleteUser', async(req, res)=>{
    const res_delete_user = {
        status_code : 500
    };

    try{
        const {user_id} =  req.body;
        const rows = await userDBC.deleteUser([user_id]);
        if(rows.affectedRows > 0){
            // 정상작동
            res_delete_user.status_code = 200;
        }else{
            // ERROR
            res_delete_user.status_code = 201;
        }
    }catch(err)
    {
        // ERROR
        console.log(err.message);
    }finally{
        res.json(res_delete_user);
    }
});

router.post('/updateUser', async(req, res)=>{
    const res_update_user = {
        status_code : 500
    };

    try{
        const {user_id, user_password, user_name} =  req.body;
        const rows = await userDBC.updateUser(user_id, [user_password, user_name]);
        if(rows.affectedRows > 0){
            // 정상작동
            res_update_user.status_code = 200;
        }else{
            // ERROR
            res_update_user.status_code = 201;
        }
    }catch(err)
    {
        // ERROR
        console.log(err.message);
    }finally{
        res.json(res_update_user);
    }
});

module.exports = router;
서버 작업은 여기 까지면 될 것 같습니다.
이제 유니티로 넘어 갑니다.
2. 유니티 세팅
2_1 기본 UI 구성

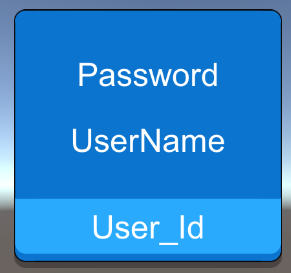
저는 먼저 user_id를 표현해 줄 Text 오브젝트와 password, user_name 수정을 할 수 있게 할거기 때문에 InputField 오브젝트 2개를 구성하였습니다.

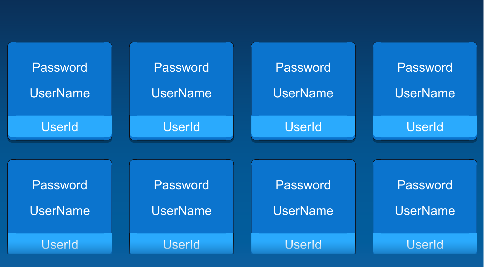
그럼 이런 식으로 서버에 있는 데이터들을 읽어와서 UserCellView 오브젝트를 생성하며 데이터를 표현해줄 것입니다.
2_2 UI 기능 구현
먼저 서버에 있는 유저 데이터를 가져오는 코드를 작업해보겠습니다.
Packets.cs
using System.Collections.Generic;

public class Packets
{
    public class user
    {
        public string user_id;
        public string user_password;
        public string user_name;
    }

    public class res_get_users
    {
        public int status_code;
        public List<user> users;
    }
}
HTTPManager.cs
using Newtonsoft.Json;
using System.Collections;
using System.Collections.Generic;
using System.Text;
using UnityEngine;
using UnityEngine.Events;
using UnityEngine.Networking;

public class HTTPManager : MonoBehaviour
{
    public static HTTPManager instance;

    public UnityAction<List<Packets.user>> onGetUsers;

    public void RequestUsers()
    {
        StartCoroutine(RequestUsersImpl());
    }


    private string _host = "http://localhost";
    private int _port = 3000;

    private void Awake()
    {
        instance = this;
    }


    private IEnumerator RequestUsersImpl()
    {
        var url = string.Format("{0}:{1}{2}", _host, _port, "/users/getUsers");
        Debug.Log(url);
        var www = new UnityWebRequest(url, "GET");
        www.downloadHandler = new DownloadHandlerBuffer();  //응답
        yield return www.SendWebRequest();
        if (www.result == UnityWebRequest.Result.Success)
        {
            var res_get_users = JsonConvert.DeserializeObject<Packets.res_get_users>(www.downloadHandler.text);
            if (res_get_users.status_code == 200)
            {
                onGetUsers(res_get_users.users);
            }
        }
        else
        {
            Debug.Log("에러");
        }
    }

}
TestMain.cs
using UnityEngine;
using UnityEngine.UI;

public class TestMain : MonoBehaviour
{
    public static TestMain instance;

    public GameObject userCellviewPrefab;
    public RectTransform content;

    public InputField inputFieldUserId;
    public InputField inputFieldPassword;
    public InputField inputFieldUserName;

    private void Awake()
    {
        instance = this;
    }

    private void Start()
    {
        HTTPManager.instance.onGetUsers = (users) =>
        {
            foreach (var user in users)
            {
                var go = Instantiate<GameObject>(userCellviewPrefab, content);
                var cellview = go.GetComponent<UserCellView>();
                cellview.Init(user);
            }
        };
        HTTPManager.instance.RequestUsers();
    }

}
UserCellView.cs
using System.Collections;
using System.Collections.Generic;
using UnityEngine;
using UnityEngine.Serialization;
using UnityEngine.UI;

public class UserCellView : MonoBehaviour
{
    public Text textUserId;
    public InputField  inputFieldPassword;
    public InputField inputFieldUserName;

    public void Init(Packets.user user)
    {
        _userId = user.user_id;
        _password = user.user_password;
        _userName = user.user_name;

        textUserId.text = _userId;
        inputFieldPassword.text = _password;
        inputFieldUserName.text = _userName;
    }

    private string _userId;
    private string _password;
    private string _userName;
}

이렇게 서버에서 주는 데이터를 유니티에서 확인할 수 있었습니다.
글이 생각보다 너무 길어지는 관계로 Insert, Update, Delete 관련 내용은 다음 글에서 다루겠습니다. 감사합니다.
'[개인공부] > Unity' 카테고리의 다른 글
| [Unity Error - 해결] 빌드 에러 Android SDK is missing required plaform API (0) | 2024.04.03 |
|---|---|
| [Unity] Rest Api 서버 이용하여 유저정보 관리 #2 (MySQL) (0) | 2023.12.01 |
| [Unity Error] unity is running as administrator (0) | 2023.09.03 |
| [Unity] Content Size Fitter 버그 증상 임시 (0) | 2023.08.24 |
| [Unity] 에디터 확장 기능으로 스크립트 일괄 제거하기 (2) | 2023.08.21 |